
又到了白色相簿的季节……
为了成为一名更好的白学家,于是,我想,应该需要先干点什么。于是我决定,要先绘制出“WHITE ALBUM”的Logo,然后再下点雪,营造出白学的氛围。
首先先找一张白学的海报。比如如下图《WHITE ALBUM2 -幸せの向こう側-》,观察一下这个Logo。

嗯,用到了渐变和描边,还有一定的角度倾斜。在这之前,我们知道,在CSS里,用
background-image: linear-gradient(to bottom, #162039, #5695b1);可以调配出渐变效果,然后用text-shadow属性可以做一个描边,最后用transform加个矩阵就可以旋转了。
所以,先来一个背景色填充,配合一些私有属性,来实现文本渐变填充:
.whitealbum {
    background-image: linear-gradient(to bottom, #162039, #5695b1);
    -webkit-background-clip: text;
    -webkit-text-fill-color: transparent;
    font-size: 5em;
}
效果:

当然了,这个属性支持Microsoft Edge、Chrome和Firefox 48,而且必须带上私有前缀。根据MDN(https://developer.mozilla.org/en-US/docs/Web/CSS/background-clip) :
[4] Gecko supports the -webkit prefixed version of the property for compatibility with other browsers and to support the text value but maps it to the unprefixed version of background-clip. It is behind the layout.css.background-clip-text.enabled pref, not activated by default, in Firefox 48. Against a related blog post, Gecko does not include text decorations or shadows in the clipping.
接着,加一个描边吧。不过描边当然不能直接text-shadow实现,否则描边会覆盖内容,效果:

所以怎么办呢?
再加一层!
.container {
  position: relative;
}
.whitealbum {
  background-image: linear-gradient(to bottom, #162039, #5695b1);
  -webkit-background-clip: text;
  -webkit-text-fill-color: transparent;
  font-size: 5em;
}
.whitealbum:after {
  content: "WHITE ALBUM";
  text-shadow: -1px -1px 5px #ffffff, 1px 1px 5px #ffffff;
  position: absolute;
  top: 0;
  left: 0;
  z-index: -1;
}
效果拔群。
然后再在container里加个旋转,万事大吉。成品代码:https://gist.github.com/zsxsoft/1db2f570df2da1b49aeb9572ec06970f
(所以就在这么个LOGO上浪费了几个小时)
接着,我们就该下雪了。
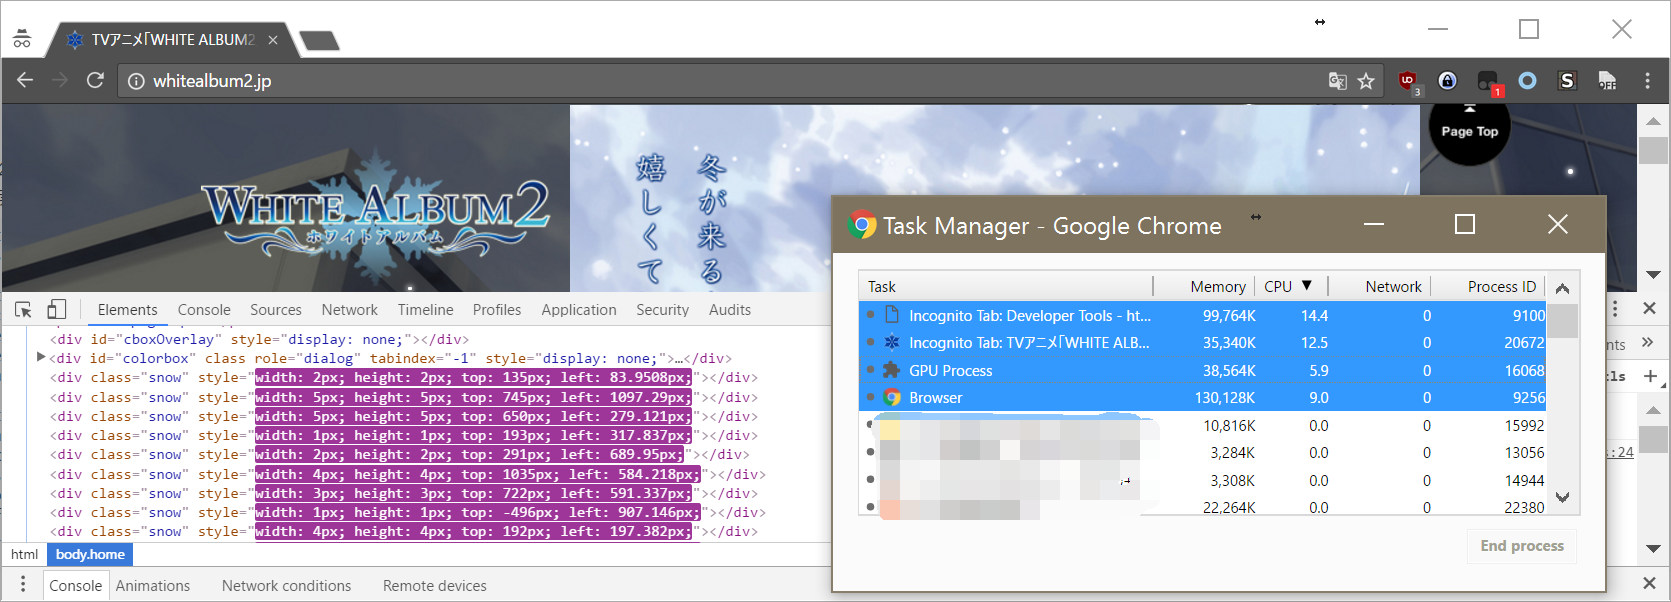
最朴素的下雪,就是像白学官网一样的,通过JavaScript动态修改top和left属性……但是,CPU占用如图,所以我们直接让它GG。
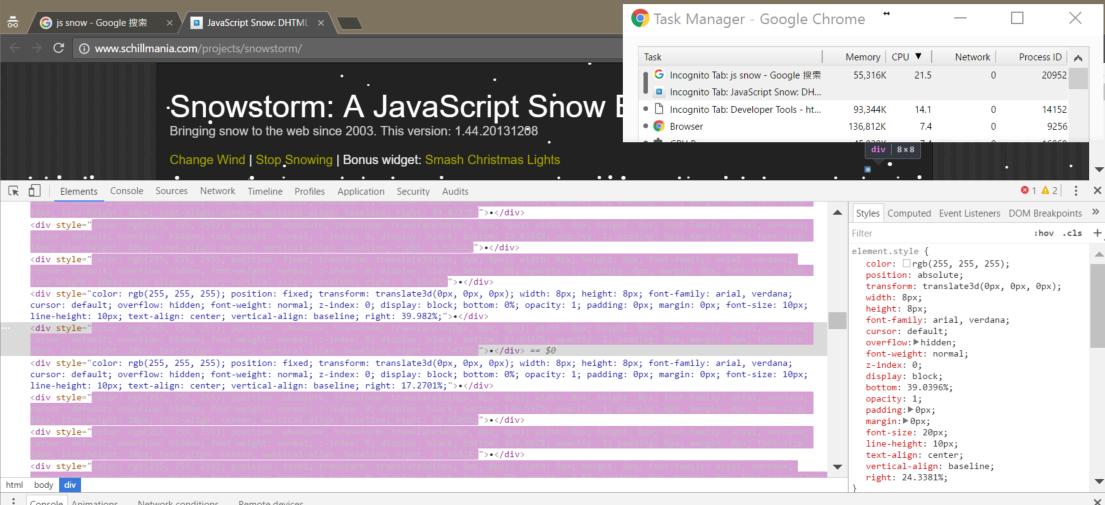
像这样的库,也必须让它GG。
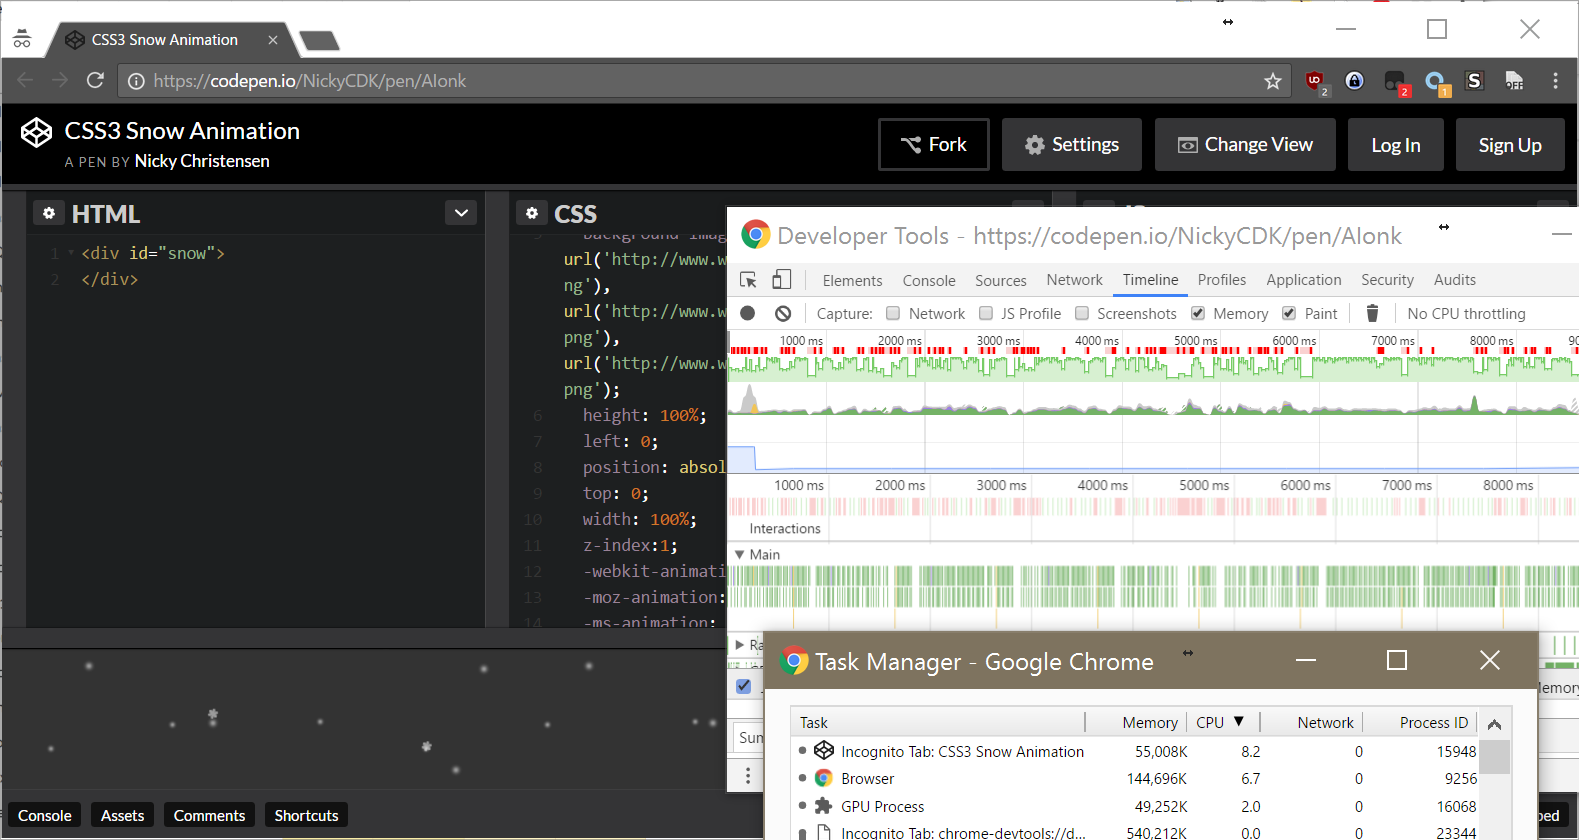
不用JavaScript控制DOM元素的话,我们可以尝试一下用CSS3. 利用background-repeat和background-position配合CSS3 Animation,效果好像不错?
比如https://codepen.io/NickyCDK/pen/AIonk:
body { background-color:#333; }
#snow{
  background: none;
  font-family: Androgyne;
  background-image: url('http://www.wearewebstars.dk/codepen/img/s1.png'), url('http://www.wearewebstars.dk/codepen/img//s2.png'), url('http://www.wearewebstars.dk/codepen/img//s3.png');
  height: 100%;
  left: 0;
  position: absolute;
  top: 0;
  width: 100%;
  z-index:1;
  -webkit-animation: snow 10s linear infinite;
  -moz-animation: snow 10s linear infinite;
  -ms-animation: snow 10s linear infinite;
  animation: snow 10s linear infinite;
}
@keyframes snow {
  0% {background-position: 0px 0px, 0px 0px, 0px 0px;}
  50% {background-position: 500px 500px, 100px 200px, -100px 150px;}
  100% {background-position: 500px 1000px, 200px 400px, -100px 300px;}
}
@-moz-keyframes snow {
  0% {background-position: 0px 0px, 0px 0px, 0px 0px;}
  50% {background-position: 500px 500px, 100px 200px, -100px 150px;}
  100% {background-position: 400px 1000px, 200px 400px, 100px 300px;}
}
@-webkit-keyframes snow {
  0% {background-position: 0px 0px, 0px 0px, 0px 0px;}
  50% {background-position: 500px 500px, 100px 200px, -100px 150px;}
  100% {background-position: 500px 1000px, 200px 400px, -100px 300px;}
}
@-ms-keyframes snow {
  0% {background-position: 0px 0px, 0px 0px, 0px 0px;}
  50% {background-position: 500px 500px, 100px 200px, -100px 150px;}
  100% {background-position: 500px 1000px, 200px 400px, -100px 300px;}
}
性能虽然好了非常多,但FPS仍然堪忧,还是必须打回去给它GG。为什么呢?
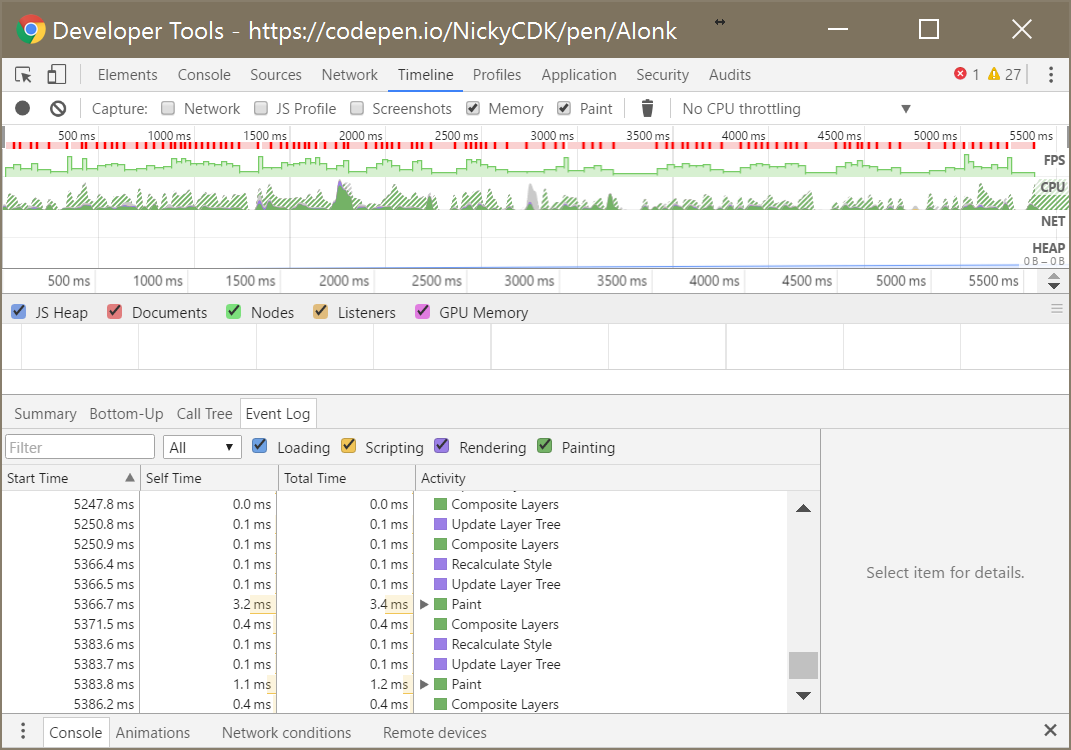
如图。
首先我们知道,网页是可以分层的,WebKit会为网页的层次创建相应的RenderLayer(渲染层)对象。然后构建一棵Render Layer Tree,用于表达元素的上下层关系。在这个例子中,WebKit先重新计算了样式(Recalculate Style),然后计算了RenderLayer Tree(Update Layer Tree),重新把元素的上下级关系弄清楚,生成了它们的位置。接着,绘制RenderLayer(Paint);最后把元素合并并绘制到屏幕上(Composite Layers)。
注意这个Paint的用时。Paint是一个昂贵的操作,而修改background-position会导致repaint,因此,GG。
另外,关于什么属性会触发什么操作,可以参见:https://docs.google.com/spreadsheets/d/1Hvi0nu2wG3oQ51XRHtMv-A_ZlidnwUYwgQsPQUg1R2s/pub?single=true&gid=0&output=html
什么才是下雪的正确姿势呢?由表,我们可以发现,修改transform是一个代价较小的操作。
先看看用JavaScript改transform来下雪的吧:http://standardista.com/snow/#slide1

完美!
@keyframes falling {

  0% {
    transform: translateY(0) rotate(0deg) scale(0.9, 0.9);
  }

  100% {
    transform: translateY(1000px) rotate(360deg) scale(1.1, 1.1);
  }

}
……教练,这还不够!
来吧,我们用Canvas下雪吧!
先用2dcontext来下雪:http://thecodeplayer.com/walkthrough/html5-canvas-snow-effect
当然,这个教程的性能也不是特别好。我为它加上了一个缓冲层实现双缓冲来渲染,修改过的代码:
window.onload = function(){
  //canvas init
    var buffer = document.getElementById("buffer");
    var ctx = buffer.getContext("2d");
    var canvas = document.getElementById("canvas");
    var canvasCtx = canvas.getContext('2d');

  //canvas dimensions
  var W = window.innerWidth;
  var H = window.innerHeight;
  buffer.width = W;
  buffer.height = H;
  canvas.width = W;
  canvas.height = H;

  //snowflake particles
  var mp = 25; //max particles
  var particles = [];
  for(var i = 0; i < mp; i++)
  {
    particles.push({
      x: Math.random()*W, //x-coordinate
      y: Math.random()*H, //y-coordinate
      r: Math.random()*4+1, //radius
      d: Math.random()*mp //density
    })
  }

  //Lets draw the flakes
  function draw()
  {
    ctx.clearRect(0, 0, W, H);
    canvasCtx.clearRect(0, 0, W, H);
    ctx.fillStyle = "rgba(255, 255, 255, 0.8)";
    ctx.beginPath();
    for(var i = 0; i < mp; i++)
    {
      var p = particles[i];
      ctx.moveTo(p.x, p.y);
      ctx.arc(p.x, p.y, p.r, 0, Math.PI*2, true);
    }
    ctx.fill();
                canvasCtx.drawImage(buffer, 0, 0);
    update();
  }

  //Function to move the snowflakes
  //angle will be an ongoing incremental flag. Sin and Cos functions will be applied to it to create vertical and horizontal movements of the flakes
  var angle = 0;
  function update()
  {
    angle += 0.01;
    for(var i = 0; i < mp; i++)
    {
      var p = particles[i];
      //Updating X and Y coordinates
      //We will add 1 to the cos function to prevent negative values which will lead flakes to move upwards
      //Every particle has its own density which can be used to make the downward movement different for each flake
      //Lets make it more random by adding in the radius
      p.y += Math.cos(angle+p.d) + 1 + p.r/2;
      p.x += Math.sin(angle) * 2;

      //Sending flakes back from the top when it exits
      //Lets make it a bit more organic and let flakes enter from the left and right also.
      if(p.x > W+5 || p.x < -5 || p.y > H)
      {
        if(i%3 > 0) //66.67% of the flakes
        {
          particles[i] = {x: Math.random()*W, y: -10, r: p.r, d: p.d};
        }
        else
        {
          //If the flake is exitting from the right
          if(Math.sin(angle) > 0)
          {
            //Enter from the left
            particles[i] = {x: -5, y: Math.random()*H, r: p.r, d: p.d};
          }
          else
          {
            //Enter from the right
            particles[i] = {x: W+5, y: Math.random()*H, r: p.r, d: p.d};
          }
        }
      }
    }
  }

  //animation loop
  setInterval(draw, 33);
}
但是呢,虽然看起来占用率低到这样,但它……还是卡……看右边FPS,慢的简直不能忍。而且,众所周知,Canvas 2D Context的性能也不高,根据这份报告:https://developer.tizen.org/dev-guide/web/2.3.0/org.tizen.mobile.web.appprogramming/html/guide/w3c_guide/graphics_guide/performance_comparison.htm

我们不如直接上WebGL吧!Threejs走起!以下,我使用的Threejs版本为r82。
我们先架设一个摄像机:
camera = new THREE.PerspectiveCamera(100, window.innerWidth / window.innerHeight, 1, 3000)
camera.position.z = 1000
然后,读取图片:
let textureLoader = new THREE.TextureLoader()
let snow = textureLoader.load('snow.png')
let snowSizes = [5, 10] // 不同大小的雪
创建三维向量,设置顶点,当做雪出现的地方:
let geometry = new THREE.Geometry()
for (let i = 0; i < 1000; i++) {
  let vertex = new THREE.Vector3()
  vertex.x = Math.random() * 2000 - 1000
  vertex.y = Math.random() * 2000 - 1000
  vertex.z = Math.random() * 2000 - 1000
  geometry.vertices.push(vertex)
}
创建场景,把雪扔进去:
scene = new THREE.Scene()
snowSizes.forEach((size, i) => {
  scene.add(new THREE.Points(geometry, new THREE.PointsMaterial({
    size,
    map: snow,
    blending: THREE.AdditiveBlending,
    depthTest: false,
    transparent: true
  })));
})
初始化WebGL渲染:
renderer = new THREE.WebGLRenderer()
renderer.setPixelRatio(window.devicePixelRatio)
renderer.setSize(window.innerWidth, window.innerHeight)
container.appendChild(renderer.domElement)
动态效果:
function animate () {
  requestAnimationFrame(animate)
  render()
}

function render () {
  let time = Date.now() * 0.00008
  camera.position.y += camera.position.y * 0.5
  camera.lookAt(scene.position)
  for (let i = 0; i < scene.children.length; i++) {
    scene.children[i].rotation.x = time
    scene.children[i].rotation.y = time
  }
  renderer.render(scene, camera)
}
再配置一点杂项,完美。
成品代码:https://gist.github.com/zsxsoft/15f5d757cc97d1dc6465f8c24951b397:
<!DOCTYPE html>
<html>
<head>
    <meta charset="UTF-8">
    <title>WHITE ALBUM</title>
    <style>
        body {
            background: #000000;
            margin: 0;
        }
        canvas {
            width: 100%;
            height: 100%;
        }
    </style>
    <script src="node_modules/three/build/three.min.js"></script>
</head>
<body>
    <div id="snow"></div>
<script>

(() => {
  'use strict'
  let container
  let camera, scene, renderer

  init()
  animate()

  function init () {
    const textureLoader = new THREE.TextureLoader()
    const geometry = new THREE.Geometry()
    const snow = textureLoader.load('snowflake.png')
    const snowSizes = [5, 10]
    camera = new THREE.PerspectiveCamera(100, window.innerWidth / window.innerHeight, 1, 3000)
    scene = new THREE.Scene()
    renderer = new THREE.WebGLRenderer()
    container = document.getElementById('snow')
    camera.position.z = 1000

    for (let i = 0; i < 1000; i++) {
      let vertex = new THREE.Vector3()
      vertex.x = Math.random() * 2000 - 1000
      vertex.y = Math.random() * 2000 - 1000
      vertex.z = Math.random() * 2000 - 1000
      geometry.vertices.push(vertex)
    }

    snowSizes.forEach((size, i) => {
      scene.add(new THREE.Points(geometry, new THREE.PointsMaterial({
        size,
        map: snow,
        blending: THREE.AdditiveBlending,
        depthTest: false,
        transparent: true
      })))
    })

    renderer.setPixelRatio(window.devicePixelRatio)
    renderer.setSize(window.innerWidth, window.innerHeight)
    container.appendChild(renderer.domElement)
    window.addEventListener('resize', onWindowResize, false)
  }

  function onWindowResize () {
    windowHalfX = window.innerWidth / 2
    windowHalfY = window.innerHeight / 2
    camera.aspect = window.innerWidth / window.innerHeight
    camera.updateProjectionMatrix()
    renderer.setSize(window.innerWidth, window.innerHeight)
  }

  function animate () {
    requestAnimationFrame(animate)
    render()
  }

  function render () {
    let time = Date.now() * 0.00008
    camera.position.y += camera.position.y * 0.5
    camera.lookAt(scene.position)
    for (let i = 0; i < scene.children.length; i++) {
      scene.children[i].rotation.x = time
      scene.children[i].rotation.y = time
    }
    renderer.render(scene, camera)
  }
})()

</script>
</body>
</html>
完美了。
又到了白色相簿的季节呢……
参考资料:


